Creating a Bill
Creating a Bill
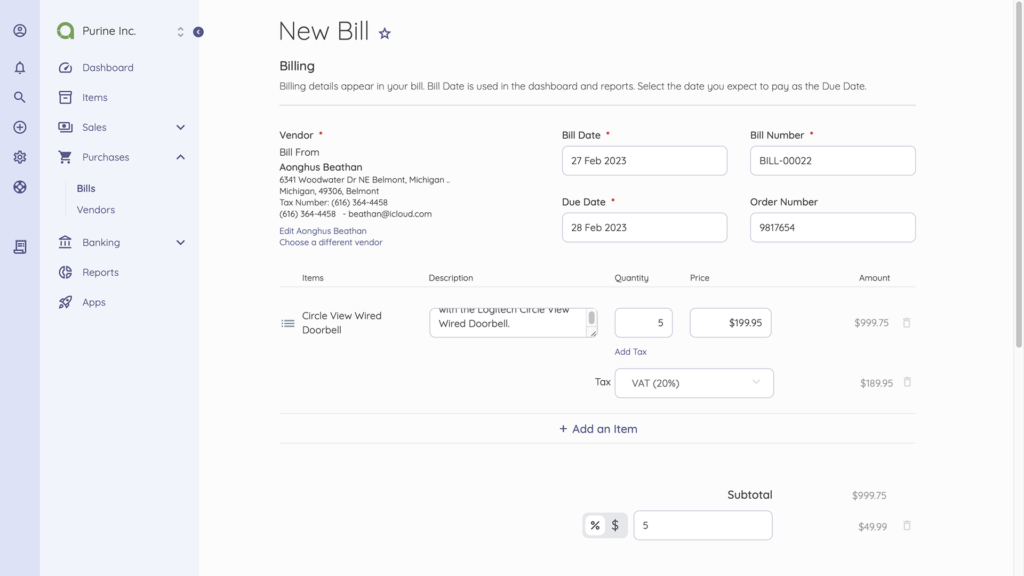
Akaunting makes easy the process of creating a bill.
Once you log in to your company’s dashboard, go to Purchases on the navigation menu bar.
- * Click Purchases to reveal a drop-down menu.
- * Select Bills.
- * From the Bills dashboard, click New Bill.
- * Enter the required billing details.
- * Required bill details include Vendor, Date, Bill number, and Item number.
- * Add a vendor to the Bill by selecting Add a Vendor.

- * Click on New Vendor, and enter the vendor details – Name, Email, Number, Tax number, Payment Currency, and others, as desired.
- * Then, Save.
- * Click on Add an Item to add services or products. Enter the item name, description, quantity, and price.
- * The Bill’s total price is automatically calculated.
- * After entering the necessary details, click Save.
You can use the Notes box to add instructions to Bills.
The Advanced option lets you define a Footer, Category and upload Attachments if necessary.
Adding Discounts to Bills
When creating a Bill, you can apply a global discount or limit the discount to specific bill item(s).
Discounts applied to specific items are called Line discounts.
To add line discounts to a bill, you need to enable the feature in the settings:
- * Go to Settings on the Sidebar and select Localization.
- * On the Localization page, scroll down to Other > Discount Location.
- * Select Both Line and Total to have both line and global discounts.
- * Then Save.
Now, to add a Line discount:
- Select New Item while creating a bill*.** Enter details of your product or services – name, description, quantity, and amount.
- * Below the Quantity input box, click on Add discount.
- * Enter the discount in percentage or currency amount.
- * The total discount is automatically calculated on the bill.
**Adding Taxes to Invoices**
- Select New Item while creating a bill*.** Enter details of your product or services – name, description, quantity, and amount.
- * Below the Price input box, click on Add Tax.
- * Click on New Tax from the dropdown options and required details – Name and Rate (in percentage).
- * Then, Save.
- * The added Tax is automatically applied to the total bill amount.
**Changing the Color of a Bill**
While creating a Bill, you can customize the color to match brand colors.
- * On the New Bill Page, scroll down to Advanced.
- * Click Advanced to expand.
- * Click the Color icon to see an extended color palette, or Enter the color code manually.
- * Then, Save.
Updated on: 23/03/2025
Thank you!